Playdeo Part 3 - Technology & Tools
Work at Playdeo involved solving unique challenges, and I’ve unpacked some of them in a little more detail here. Below is a playthrough of Episode One in the game, to give you a sense of what the game looked like.
Smart, double-buffered video #
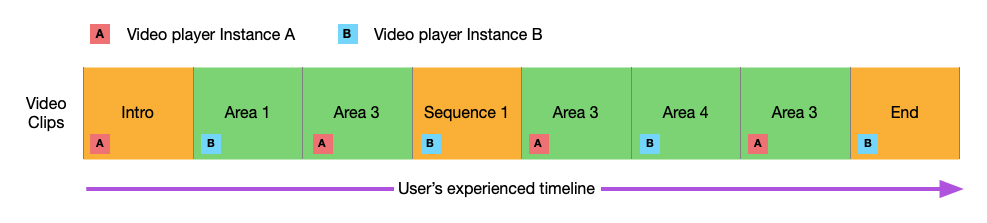
In Playdeo’s games, we compress and linearise hundreds of separate video clips into one large MP4 file, and when we need different camera angles or video sequences, we ask the video player to play from different timestamps in the file.

There are two classes of clips. Sequences are clips of narrative video, usually featuring dialogue, and they are typically played back in order, and only once to the player. They tell the story. The other class of clips are Camera Coverage, and they are typically environmental shots, and are designed to loop. These are the clips we use when you are navigating Avo around the world.
During our prototyping phase, we were mostly concerned with the content and interactivity of the visual frame, and not so much about narrative and story. All that changed with our Alpha 2 prototype of Avo, and for the first time we had an actor, a script and a need to edit different takes and camera angles together into a coherent timeline. This instantly presented us with a problem; Moving video playback to different portions of a single video file with a seek command was much much slower when there’s an audio track. Without audio, the seek response is near instantaneous, and with audio, it drops down to about 0.2s. That might not sound a lot, but it’s extremely noticable when playing the game, and each camera cut or edit freezes the frame before delivering new frames.
The solution was to run two video decoders in parallel, both reading from the same MP4 file. Modern iOS hardware made this feasible in most newer devices and for the older iPhone and iPad models we were careful to leave an option to disable the second video player entirely. This allowed us to support devices like the original iPad Air from 2013, at the expense of the improved edits. It left a small pause in video playback each time there was a cut, but it didn’t detract too much from gameplay.
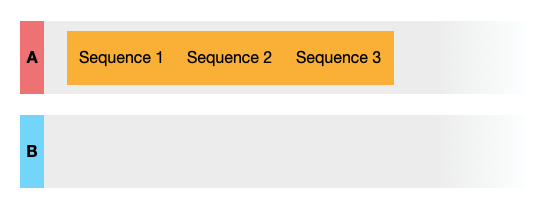
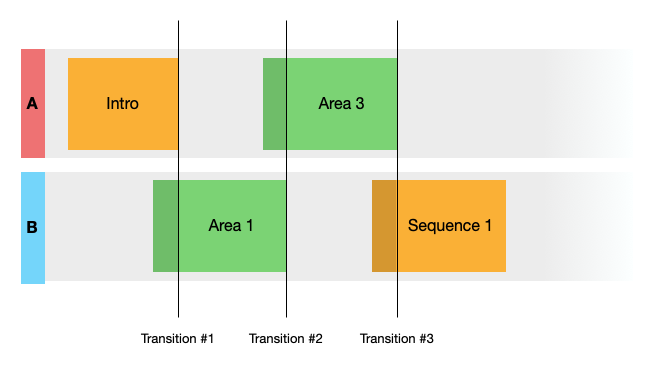
The system internally was known as AV2, and made use of an asynchronous queue system, and two consumer classes representing each underlying instance of the video player. You could either request video be played immediately, or after the current clip has finished, in more of a playlist fashion. It would also be smart enough to understand that when asked to play a clip that immediately followed the currently playing clip inside the MP4 file, it would simply let the playhead run on into the new video in the currently active player, saving a swap to the inactive player, and creating a smoother experience. To put that another way, if Clip A, B and C are adjacent within the video file, and you asked to play them all back, instead of splitting it up across the two different video players, it plays all three back to back in the same video player.

The other further development we made was to give the video playback plugin complete autonomy over when it should either loop back to a starting frame, stop delivering video. On mobile devices you commonly suffer interruptions that stop your game from being the primary application in focus. These interruptions would cause problems with video playback synchronisation, and when you return from an interruption the video player might have advanced beyond the limits of the clip you wanted to play. Because the video texture is inside Unity is marked as External, if the playhead of the video player has strayed beyond the clip it was supposed to play, the video frame overwrites the previous texture in memory. The players see flashes of video frames that are out of sequence, and it destroys the gameplay experience.
To get around this issue, every time we request certain frame ranges to be played back, the video player creates guard zones it can autonomously respond to during playback with no connection to Unity. AVFoundation on iOS has this incredibly useful function called addBoundaryTimeObserver(forTimes:queue:using:) for exactly this use-case.
The video plugin grew in complexity over the lifespan of Avo, and thankfully AVFoundation is an incredibly rich media API to sit on top of, which prevented this code from spiralling into something much more complex and time consuming. We also got an Android build running with a custom video player we implemented in house, but this never saw the light of day in a full release, sadly.
Bluetooth latency and PathEDL #
A few months after getting the double buffered video player system working, Apple announced the removal of the headphone jack on their iOS devices, and so started a huge increase in the number of bluetooth audio devices in everyday use. As these bluetooth devices became more commonplace, we started to use them with our laptops.
For the longest time, I was puzzled over the variable seek response time for video in our system. Sometimes video would be quick and responsive, other times it would feel sluggish and slow to react. It was a number of weeks before I put two and two together and realised it was my own use of Bluetooth headphones while programming that would be the root cause of this change.
As mentioned in the Smart, double-buffered video section, there’s an inherent latency of around 0.2s for video with an audio track. Bluetooth audio adds its own latency on top of this, and can vary between 0.2s and 0.3s depending on the manufacturer. So during gameplay, we need to account for a delay in any request to play new video from 0.2s up to 0.5s. This presented a problem for us in the way Avo’s movement triggers different camera angles.
Luckily on iOS it’s very easy to retrieve the exact value of this latency from the shared audio session:
static float GetAudioOutputLatency() {
    return [[AVAudioSession sharedInstance] outputLatency];
}
So the total latency in the system is equal to 0.2s + AudioOutputLatency. Avo’s line drawing method of movement is actually the perfect uniform system for accomodating future predictions. If it takes us 0.4s to swap cameras as Avo moves, all we need to do is make Avo’s trigger point be constantly ahead of him by 0.4s, thus triggering perfectly by the time his legs catch up to the future prediction.
In the video above, there’s a demonstration that shows the difference Bluetooth audio makes to the latency. The white cube in front of Avo represents the distance from his current position that directly correlates to the video seek delay. The longer the audio latency, the further away the cube is, and the faster Avo moves, the further away the cube gets.
For Avo’s standard speed, the cube is roughly one width away from him when not using Bluetooth. This then increases to roughly two widths of the cube when Bluetooth audio is used. This is a small difference at his relatively slow standard speed, but within the game we give him a little speed boost every time he collects a jelly bean. This means his speed can be much greater depending on the situation. This means that the future prediction distance is correspdondingly much larger.
As my work on accounting for camera change latency started to bear fruit, it became apparent that we now had an adjacent problem to contend with. If you happened to draw particular lines which interacted badly with our camera zones, like drawing multiple loops that graze a closeup camera, the resulting video as he walked the line was dizzying, as it would rapidly cut to a closeup, then back out to a wide shot, over and over again. Along with that particular extreme scenario, there were numerous instances of these bad lines, and the player had no way of knowing if their path would look bad while being traversed. We needed a generalised solution.
The answer was once again in the determinism of the line drawing movement system. Since we only allow players to draw a line which is navigable, the line is a perfect representation of the future. This line will be walked, and the only thing that can change is the speed at which it’s traversed.
Up until then, the camera system was entirely based on collider triggers. When a collider entered into a zone, a camera change would be triggered immediately. The latency solution meant that the collider causing the change was in advance of Avo’s current position by 0.2-0.5 seconds, but it was still real-time. We needed to move to a solution where the entire line was simulated, and every future camera change collected by a system I called PathEDL.
In video editing, the Edit Decision List represents the desired arrangement of video frames that an editor wants to arrange for playback. In our case, every line drawn by the player would be its own little video edit, with a beginning a middle and an end. If we sample the points down the line, and correlate them with the camera zones they pass through, then we can form a list of all potential cameras to use for every point along the line.
We can then run a set of filters for these points, and derive a final set of camera cuts best suited to frame Avo as he walks, or in some cases zooms down the line.
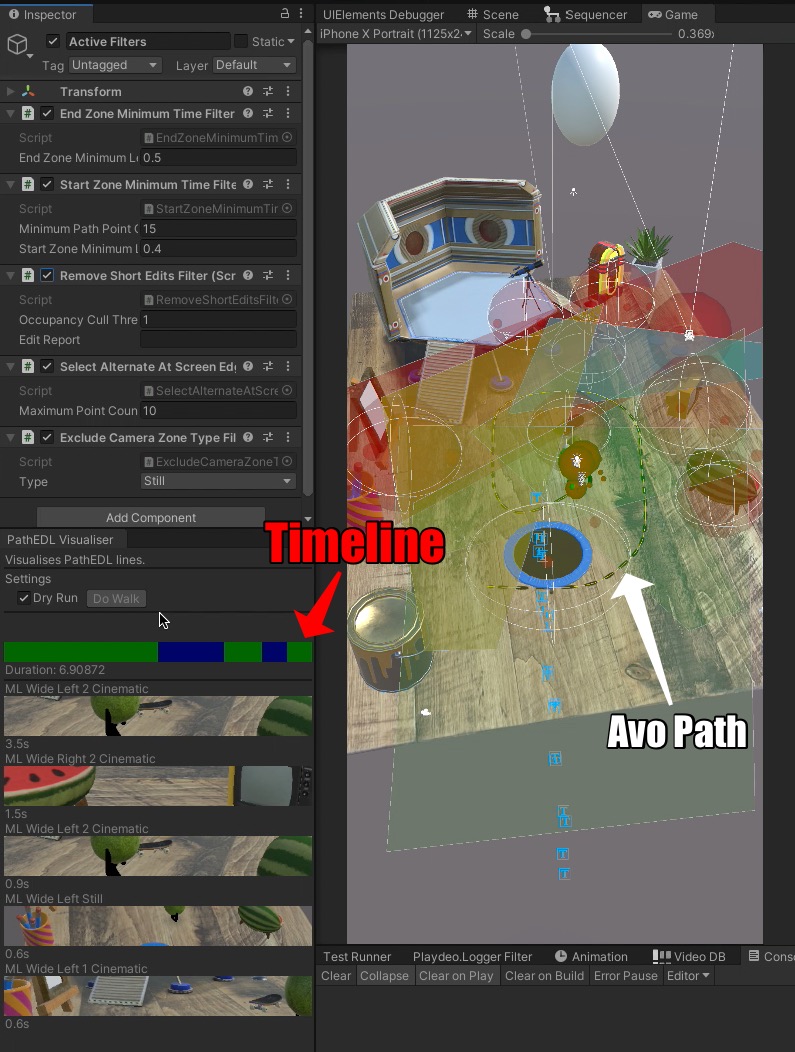
In the above image, you can see an example of the PathEDL system at work. In the right pane, you can see the geometry of the level, including the camera visibility zones, and his currently drawn path as the standard dotted black line.
In the bottom left, you can see the timeline which give you a visual representation of all the cuts that will occur. The overall duration for this line is 6.9 seconds, with 5 different camera angles that will frame Avo.
The key to this system is that it applies rules not only spatially, but across time as well. In the top left, you can see several filters that are configured to apply to Avo’s movement path.
| Filter Name | Description |
|---|---|
| Start Zone Minimum Time Filter | Ensures that we dwell for a minimum of 0.4s before making our first cut. This helps the player understand the first cut with good spatial awareness |
| End Zone Minimum Time Filter | Ensures that the final camera cut that will occur for this path is at least 0.5s long. It provides a sense of stability and finality to the sequence of cuts that will frame Avo's movement |
| Remove Short Edits Filter | Removes any camera edits within the PathEDL that would last for less than ~1 second. This helps make Avo's movement feel less frantic |
| Select Alternate At Screen Edge Filter | ensures that short lines drawn at the edge of the screen select any cameras that are available other than the existing one. This means people can escape being trapped in a view they do not want |
| Exclude Camera Zone Type Filter | Ensures that short lines drawn at the edge of the screen select any cameras that are available other than the existing one. This means people can escape being trapped in a view they do not want |
As you change or toggle these filters, you get a live preview of how it will affect the edit, and construct a filter set that makes appropriately player-friendly choices. This had an absolutely transformative effect on the game, and walking around felt far less unpleasant and awkward.
One of our developers Geraldo Nascimento really took the initial idea and extended it with a lot of great looking visualisation tools and quality of life improvements for later work.
The Sequencer #
The other distinct aspect of working with video inside Unity was a matter of timing. The video playback code was entirely separate from Unity, and so we needed to integrate video-time with Unity-time in a seamless way. Jon had previously used a node-based system used by UsTwo games on Monument Valley, and suggested we use something similar. We ended up with a tool we called the Sequencer.
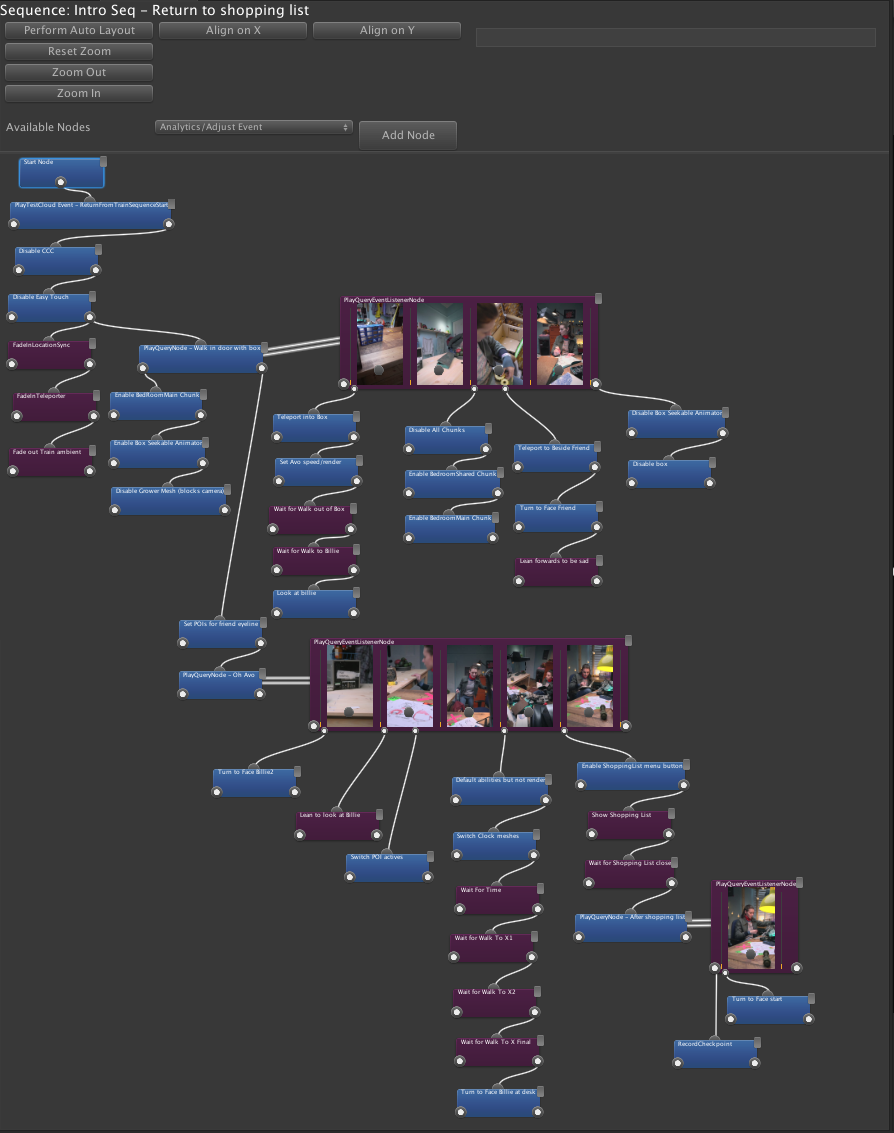
The graph starts executing from the top left node, and continues down each connection as each node finishes. Nodes can either be of type void and span no frames, or of type enumerator and span one or more frames. The purple nodes with thumbnails show the Play Video nodes, where additional node chains can be triggered by reaching specific frames in the video.
This allowed us to seamlessly mix player events and video events during the level design process, and leave the design open, so we responded to the flow. We could change something that was previously triggered by the player at any point, and incorporate it to be triggered at a certain frame in the video, or vice versa.
A basic wait node looks something like this:
public class WaitForTimeNode : SequenceNode, ISequenceNodeEnumerator
{
    public new static string ReadableName = "Delay/Wait For Time";

    public float WaitTimeInSeconds;

    public IEnumerator GetEnumerator()
    {
        float startTime = Time.time;
        if (!isPlayerFastForwarding)
        {
            while (Time.time < startTime + WaitTimeInSeconds &&
              !isPlayerFastForwarding)
            {
                yield return null;
            }
        }
    }
}
As we developed this system from extremely humble beginnings, it was clear to us that this architecture was very powerful. It took more and more of a hold on how we thought to construct authored experiences in the level, and we improved it with every title we worked on. Later iterations featured a hugely improved authoring UI, and we also expanded the node flow to allow for looping and light branching logic.
The isPlayerFastForwarding boolean is an interesting little feature related to two things. One was having the ability for players to skip video sequences during gameplay, and the other is level state. When we started to work on Avo, we had little to no idea about the player’s game progress. Would we need to store the state of doors and keys, for instance? What about spawned enemies? A player inventory perhaps? We had no idea!
In order to keep it extremely open and flexible, we based our solution around authored checkpoints. In any given level, a number of linear checkpoints are created, each of which might be to a sequence that was run to mutate the level state. We store which checkpoint a player has reached, and upon a load of that level, we step through each checkpoint and play the associated sequences until we hit the last one, and let the player carry on. This way we can leave level designers complete autonomy, as long as progression-based state mutation is always handled by the sequencer.
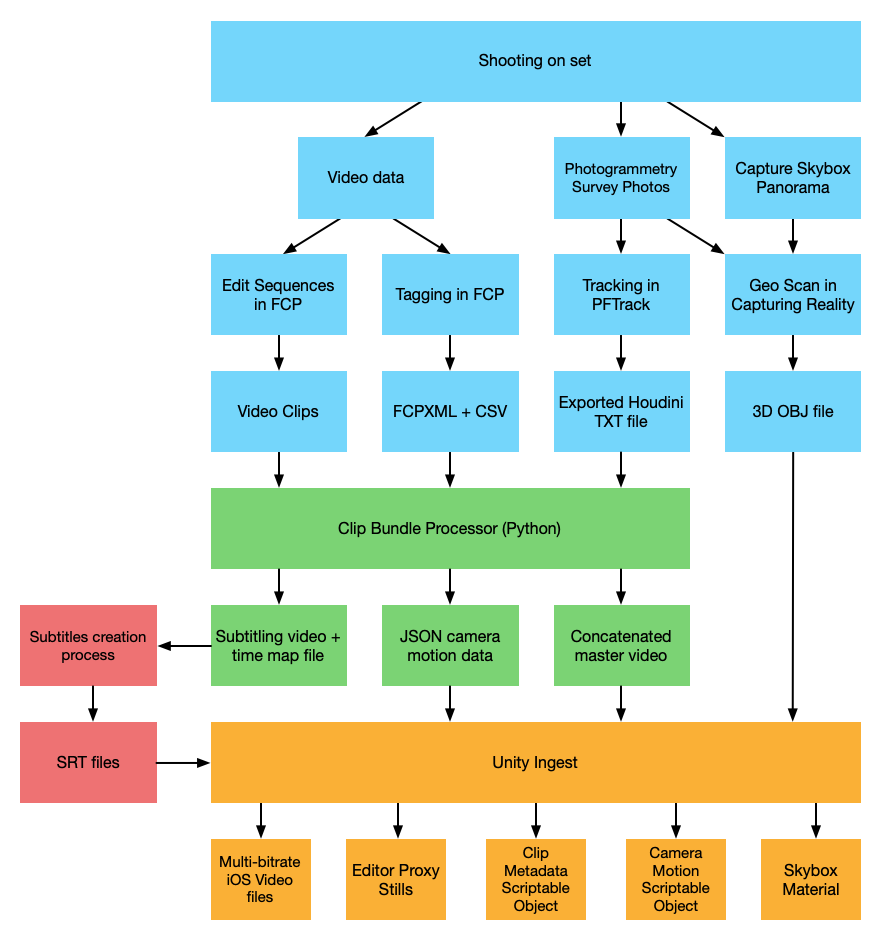
The video pipeline #
As the amount of data we had to process was undergoing a dramatic increase, we also had to keep on top of the data pipeline. During my years working at Framestore, I knew that for complex setups using multiple pieces of software, the number one source of issues was human error. It’s a balancing act. A pipeline that’s too restrictive will make unforseen errors cost a great deal of time, as they bottleneck on access to the developers. Not restrictive enough, you let problems roll downhill into Unity, and they become much harder to diagnose.
We refined the ingest process over many months, and initially I was the one person who was responsible for running and maintaining this process, but that slowly shifted, and became a job mostly run by our editors or other developers on the team. This went hand in hand with an increasingly complex process, as we had to accommodate new features like subtitles, compound clips, and post-production software changes. The ingest script grew to about 3500 lines of Python, and contained parsers for FCPXML, Resolve CSV files, PFTrack data, FBXs and video files.
Half the battle with this type of work is to find ways of making concrete cross-references between different files running through different pieces of software. Some software is scriptable, and we made use of this in PFTrack, where an export of the data would also create additional metadata files important for these connections. Sometimes you need to ask for specific naming conventions to be obeyed, and you enforce that during ingest.
Over the course of about 3 months, we gradually went from a situation where I had to run every single ingest step to one where others were self sufficient. A surprising amount of this time was spent refining error messages that would allow the user to diagnose issues themselves. This wasn’t always easy, and required tracking far more data than you’d make use of in the final output, like specific line numbers of input files which might go on to cause issues later.
I class this pipeline as generally successful, as we were able to bring freelancers into the company and train them in using this within a few days. Ultimately this pipeline would be replaced in later games with one based entirely on Playdeo Capture, but during the period before that, the pipeline tools were solid and saved us a huge amount of time.
Playdeo Capture #
After Avo shipped, we could see the value in being able to shrink our video pipeline down. Using three different pieces of software every time we want to set up a new scene, with the photogrammetry and tracking taking at least a day was very awkward. It prevented us from quickly prototyping ideas, and was prone to human error. Our toolset in Unity was slowly growing to make scene assembly and authoring far quicker than before, and we needed to keep parity.
The idea of using ARKit on iOS to be able to record an AR session was an idea we’d had a while back, but it wasn’t obvious if it was feasible. iOS has generally great media performance, but ARKit was still a relatively closed API. We worked with Sam Piggott on a Swift app that would record and store camera positions. In the early days of ARKit, you were prevented from doing much beyond displaying a 3D scene to the user. In order to make a recording system work, Sam figured out a way to peek into the hidden AVCaptureSession owned by ARKit and set up an AVAssetWriter to stream it out while also running the session. Luckily for us Swift has retained the core aspects of introspection and reflection that were present in Obj-C.
private func attemptToRetrievePrivateCaptureDevice(session: ARSession) {
    let sensors: NSArray = session.value(forKey: "availableSensors") as! NSArray
    let imageSensorClass: AnyClass = NSClassFromString("ARImageSensor")!

    for sensor in sensors {
        debugPrint("Checking sensor \(sensor)")

        let parentImageSensorClass: AnyClass = NSClassFromString("ARParentImageSensor")!

        guard
            let sensor = sensor as? NSObject,
            sensor.isKind(of: parentImageSensorClass) == true,
            let captureSession: AVCaptureSession = sensor.value(forKey: "captureSession") as? AVCaptureSession,

            // The first input should be the "Back" camera
            let deviceInput: AVCaptureDeviceInput = captureSession.inputs.first as? AVCaptureDeviceInput else {
                debugPrint("Failed to get AVCaptureDeviceInput")
                return
        }

        underlyingCaptureDevice = deviceInput.device
        underlyingCaptureSession = captureSession
    }
}
This code isn’t necessary with more recent versions of iOS. There are also a number of open source projects that do similar things in slightly different ways.
This workflow was successfully integrated into the entire end-to-end process, and we could produce a working iOS game featuring data recorded on Playdeo Capture. The image quality was obviously not as high as the images from Timo’s high end DSLR cameras, and the ARKit mesh fidelity was lower, but it did allow for prototyping and ad hoc workflows. The original ingest python script was replaced entirely. ffmpeg was now run via Unity. We had successfully demonstrated a workflow which had cut the pieces of software down from 5 to 2.
This project became important during the COVID pandemic in 2020. With all of the studio working from home, producing new video content became impossible. Playdeo Capture became literally the only way we could prototype new ideas, and that’s when Jack started experimenting with Playdeo Makes, episodic video featuring modular tabletop mini games and exercises you play with Avo. Nearly all of this was bootstrapped by Jack alone in his loft, with makeshift cardboard props serving to create a set and series of camera positions.
As lockdown eased, it became possible to have actors on a set, as long as a fairly strict set of guidelines were obeyed. Recent advances in iOS hardware had meant that we could now shoot in 10-bit log at 4k, and it gave a huge uplift to the visual quality, so much so that we needn’t go back to DSLRs. The only restriction was in having fixed cameras, as 10bit mode was incompatible with ARKit recording.
The last innovation that I want to mention is how we arranged our metadata. It was recognised that there was still a role for editing software like Final Cut pro. However, manual logging of this data was slow, awkward and error prone. I rewrote and simplified the way we log clip data, and we standardised on a naming convention of scene, shot, take and camera number.
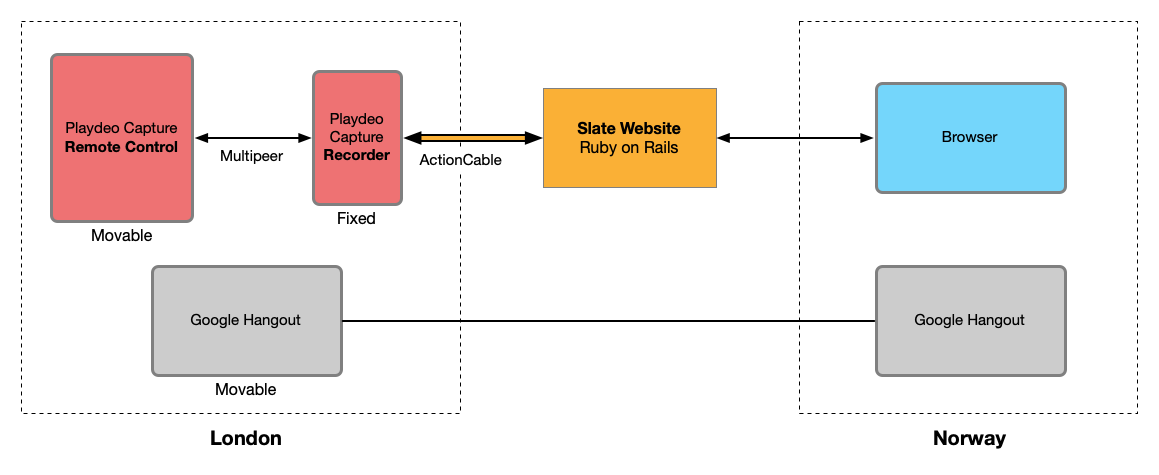
Because of the original architecture of Playdeo Capture, all data was centralised on the iPhone. For a future version we’d want this performed on the server, but for now the phone held the data model for clips, and the video data. Any logged information would need to reach the phone somehow.
At the same time Timo was stuck in Norway because of travel restrictions. I set up a small rails website to allow shot logging. Timo was present on set via a Google hangouts call, so was able to see and hear what was happening. He could sit in Norway and act as Script Editor and Clapper Loader. He would type the scene, shot and camera numbers into the site, and it would calculate the take. Then in Playdeo Capture every time the record button was hit, we could query the website and fetch the appropriate metadata. This would then be baked into the session on the iPhone.
The connection to the Rails site was done with the ActionCableSwift Swift package, and the relatively complex connection was managed with a large state machine implemented using SwiftState. Both of these are excellent packages to work with, and helped encapsulate a lot of complexity that emerged from the period where this remote data solution was hacked up in.
Then when it comes to exporting the data form the iPhone we create a fake FCPXML file that simulates a Final Cut Pro project. This meant that metadata would be preserved as it was passed into and out of Final Cut Pro, and we could retain the correct metadata and position data automatically.
Fastlane and the build pipeline #
Early in our prototyping we implemented a Fastlane pipeline to manage the Xcode modification, build and upload process. When Apple updates Xcode, Unity tends to lag behind upstream changes, and their Trampoline system for producing xcodeproj often ends up causing Xcode to display many deprecation and misconfiguration warnings. Fastlane is a sophisticated project that automates as much of the Apple build pipeline as possible, and allows for relatively straight forward programmatic manipulation of Xcode projects, and allowed me a hook to address these configuration issues.
Amonst other things, we used it for the follwing tasks:
- Automatically fetch large assets from remote storage
- Manage signing identity
- Add plugin code to the Xcode project
- Automatically set version and build numbers
- Provide custom On-Demand Resourcing setup manipulation in Xcode
- Process and badge the launch icons to distinguish between build types
- Toggle feature flags
- Enable/disable the complex analytics code, to reduce dev build times
- Auto tag releases in git
- Upload builds to Testflight
- Post to Slack channels for automatic notifications
It really is a Swiss Army Knife for handling any tasks that it might be too complex or difficult to perform in Unity, with the downside of increasing project dependencies. Where possible, we always made Unity capable of producting functional output for local development, but this ended up slipping behind as the project got larger.
I’ve made a gist of the Fastlane action, Unity C# class and example usage. It’s a cut-down version of what we used, but the core essentials are present. It’s relatively easy to create your own custom command-line arguments to create a structure for build manipulation.
The rest of the build setup was based on a standard configuration of a CI server. We initially used Go CD, and later swapped to Jenkins as others in the team were more familiar with it, with installation and maintenance therefore easier to distribute among more people.
We found Go CD suffered from quirks, like an obscure bug relating to how the servers and clients are built and run as GUI tools from the Dock, leading to a pollution of the environment. In this case, to fix a bizarre error you had to ensure you unset CFProcessPath early on before running Unity. This is an oddity that dates back to the changeover from Carbon to Cocoa on the Mac, and was a particularly ancient and difficult to pin down issue.
Paying attention to your build process early allows the project grow in complexity without it becoming unwieldy over time. If you have organised structure where you can hang additional code, it helps guide people into solutions and amendments which hold up over the lifespan of the project, and a more predictable place for methods and files. Do ensure that the right people review code changes, however, as build system fragility is not always obvious until the build server breaks!
Metasploit #
Although not strictly part of the technology, sometimes you get to contribute to the authenticity of technology’s representation in media.
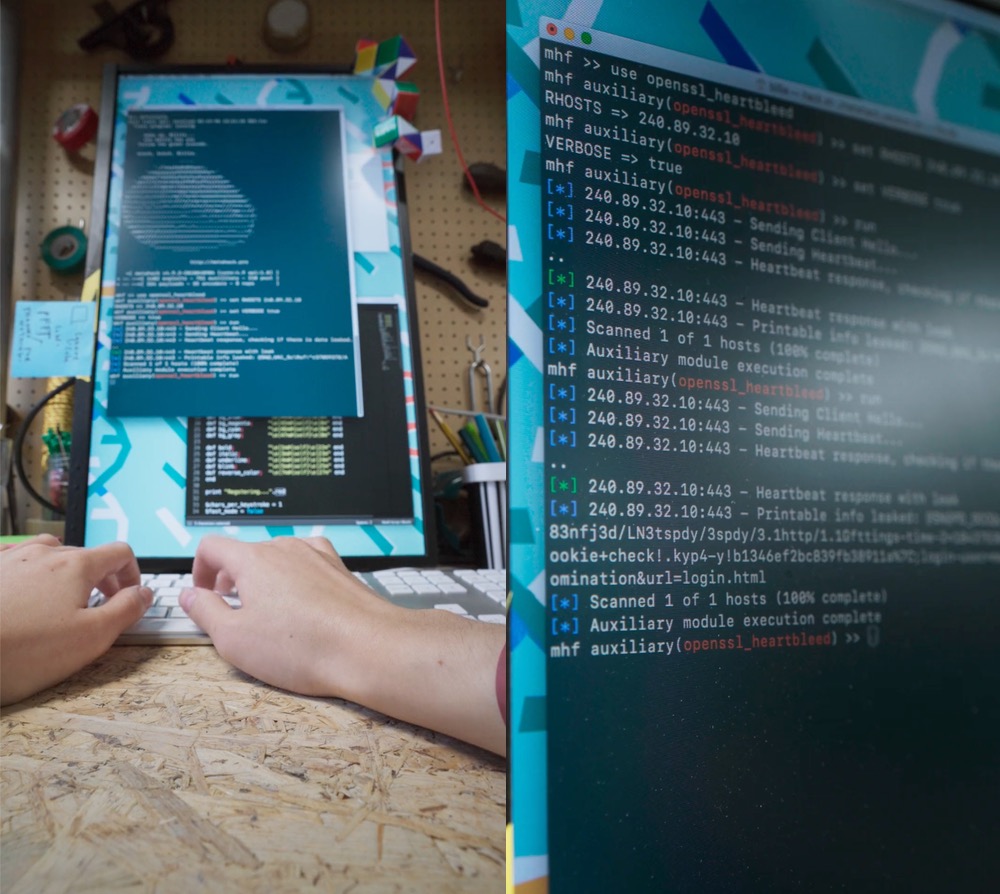
This is a geeky easter egg inside Avo, and I’m not sure if anyone ever noticed. For the hacking scene, I took the real console output of Metasploit and rewrote it to be more in-keeping with the Avo universe. The actual activity run inside it was the real OpenSSL Heartbleed exploit from April 2014.
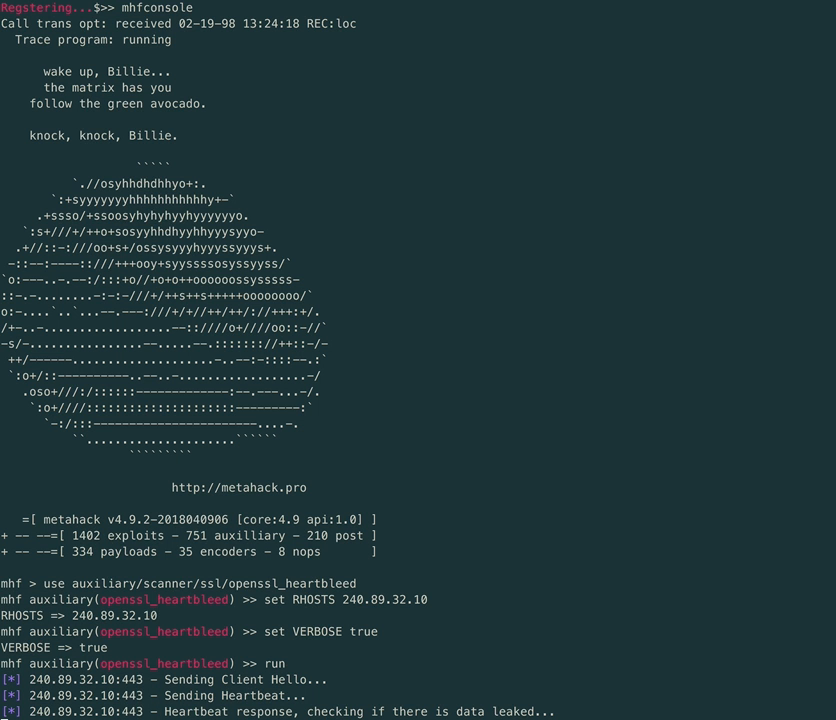
The other component was a small Ruby script which allowed any keyboard interaction to trigger ASCII text to be written out to the terminal. This would give Katie an ability to type anything on the keyboard and produce sensible output, giving the impression of an expert as Billie would be.